

Perfect Blue Cheese-Stuffed Burgers
“Age is not important, unless you’re a cheese.” Helen Hayes

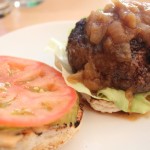
Perfect Blue Cheese Stuffed Burger (photo by MJ Byers)
Dish: Perfect Blue Cheese-Stuffed burgers
BY MJ BYERS
Last week, I dazzled (or bored) you with a tale of my kitchen experimentation. Today, I am supplying the full recipe for what I am humbly dubbing Perfect Blue Cheese-Stuffed Burgers (why waste everyone’s time with false modesty?). Again, I’m making the instructions super-simple for those who don’t feel completely at home in the kitchen. I’ve done a bit of trial and error to arrive at this recipe, and it yielded the tastiest, juiciest burgers I have ever prepared. You’re welcome, world.
How Do I Make These? For four large (8 oz) burgers, you’ll need the following (obviously, you can make more, smaller burgers with the same ingredients, but I’ve gone with hearty restaurant-style portions):
- 1 lb ground beef (I used 93% lean)
- 1 lb ground pork (I used 77% lean)
- A few pinches salt
- Pepper to taste
- Tabasco to taste (see below)
- Fresh chopped garlic or garlic powder – 2 teaspoons or to taste.
- Crumbled blue cheese (3 oz)
- Sliced secondary cheese of your choice (I like emmenthaler or gruyere) – the important thing is to pair the blue with something complementary and not duplicative – unless you just really, really like blue cheese. Blue on blue, in addition to being a rather dodgy Bobby Vinton song, is a bit too much for me from a flavor perspective.
- Hamburger buns – err on the side of hearty, so that they don’t dissolve under juiciness. I used standard potato buns and they weren’t quite up to the task. Brioche may have worked better.
- Condiments and toppings of your choosing
- Butter (I used light butter)
Mix beef and pork together in a bowl, adding a dash of salt plus Tabasco, pepper and garlic to taste. Even if you don’t love splcy food, do add some pepper and Tabasco – you can use them sparingly enough to add flavor dimension without creating a “spicy” burger.
If you have a stuffed burger press: Fill each side of press with 4 oz. of meat – press down slightly to flatten. You can try going smaller but – depending on its size – the press may not crimp properly if you make the patties too small. If a separate plate was provided, use it to to create well in the center or each patty by pressing down on sides of plate. If no separate plate, try a large serving spoon or your hands. Add ½ to ¾ oz of blue cheese to well of burger on bottom side (this is the side with the lifter, if your press comes with one). Close lid and crimp burger to seal. Use lifter to remove burger from press and transfer to a platter. Repeat for each burger. As FYI, I used a Williams-Sonoma press – click here for more on that.
If you don’t have a press: Same instructions, but you’ll have to hand-form the patties and the center well. To do this, form the patty halves (4 oz each) and use your thumb or a spoon to create a well on each side. Place your cheese into one of the wells, and cover with the other side of the patty and press the edges to form the seal. You’ll need to be careful to form a tight seal, or the cheese will ooze out during cooking. Repeat for each burger.
From here, grill each burger (medium high heat if you’re doing on the stovetop – pre-heat the skillet before adding burgers) for 3-5 minutes on the first side (for medium doneness, aim for 4 minutes). Flip, then grill for another 4 minutes on the other side. Then, flip again and add cheese, grilling for another 2 minutes or until cheese is melted. For faster melting, try covering the burgers with a domed lid of some sort (I used my wok lid).

Multi-tasking in my micro-kitchen (photo by Tony Byers)
When you begin the cheese-melting process, place each butter-covered bun on the grill as well (I used my George Foreman grill, having used my skillet grill to cook the burgers, but made the mistake of lowering the lid; don’t do that – it flattens the buns). An alternative approach is to instead melt the cheese on the bun(s), in your oven’s broiler. I did this recently for some yummy egg sandwiches I made – I’m going to try it on these burgers next time.
And that’s it!
Expensive vs. Cheap: Doesn’t have to be expensive, but this comes down to what grades of meat you select and where you shop.
Healthy vs. Tasty: Super tasty, not high on the health-o-meter. Lower fat grades of meat help, but you do trade off some flavor and juiciness the lower you go on the fat content.
Preparation Time/Ease: The whole thing shouldn’t take more than 30 minutes.
For our latest foodie adventures, follow us on Twitter: @angelsontongue


0 Comments
You can be the first one to leave a comment.